
DutchGrid certificate
This section describes how to obtain and install a DutchGrid Grid certificate. This is a prerequisite to get started on the Grid:
Obtain a DutchGrid certificate
In case that your institute does not support SURFconext and is not possible to get a Sectigo certificate certificate, then you can apply for a DutchGrid CA certificate. You can request a DutchGrid certificate by launching the JGridstart tool.
Request a DutchGrid certificate
Note
If you are on macOS, ensure that xquartz is installed with homebrew.
Log in to your UI account with X forward enabled, e.g.:
$ssh -Y homer@ui.grid.sara.nl # replace "homer" with your username!
In the case of running on macOS, it may be necessary to specify the path of XAuth in
~/.ssh/configwith:XAuthLocation /opt/X11/bin/xauthDownload the the
jGridstarttool:$wget https://ca.dutchgrid.nl/start/jgridstart-wrapper-1.18.jar
Run the wizard:
$java -jar jgridstart-wrapper-1.18.jar
Follow the wizard instructions. You will typically go through these steps:
Start the Wizard by pressing
Request new ..buttonGenerate request by entering your details (name, surname, email, organisation). At this stage you will provide the password for your Grid certificate - make sure you keep this safe!
Submit request. This will create your private
userkey.pemfile in your~/.globusdirectory.Fill in and print the verification form by pressing the
display formbutton. Once you fill in the form, save it locally.Close the wizard
Check your details in the printed form and contact your institution’s
Registration Authority(RA) in person. The RA person will check your identity (id or passport or driving license) and sign the printed form.Once your form is signed by the RA, send a scanned copy to the DutchGrid CA via email or fax. The contact details can be found in the printed form, but you can contact also helpdesk@surfsara.nl if you are in doubt.
The DutchGrid CA will finally send your certificate via email within ~a week. Once you have a received your certificate you will need to install it both on your UI account and your browser (UI or laptop). We’ll see this next.
Note
If you need help to obtain your DutchGrid certificate, please read the JGridstart guide or contact us at helpdesk@surfsara.nl.
Retrieve your DutchGrid certificate
Once your request is approved, you will receive an email titled “DutchGrid CA certificate …”. Now you need to retrieve the new certificate:
Log in to your UI account with X forwarding enabled, e.g.:
$ssh -Y homer@ui.grid.sara.nl # replace "homer" with your username!
Run the wizard again:
$java -jar jgridstart-wrapper-1.18.jar
Then a window pops up similar to the following:
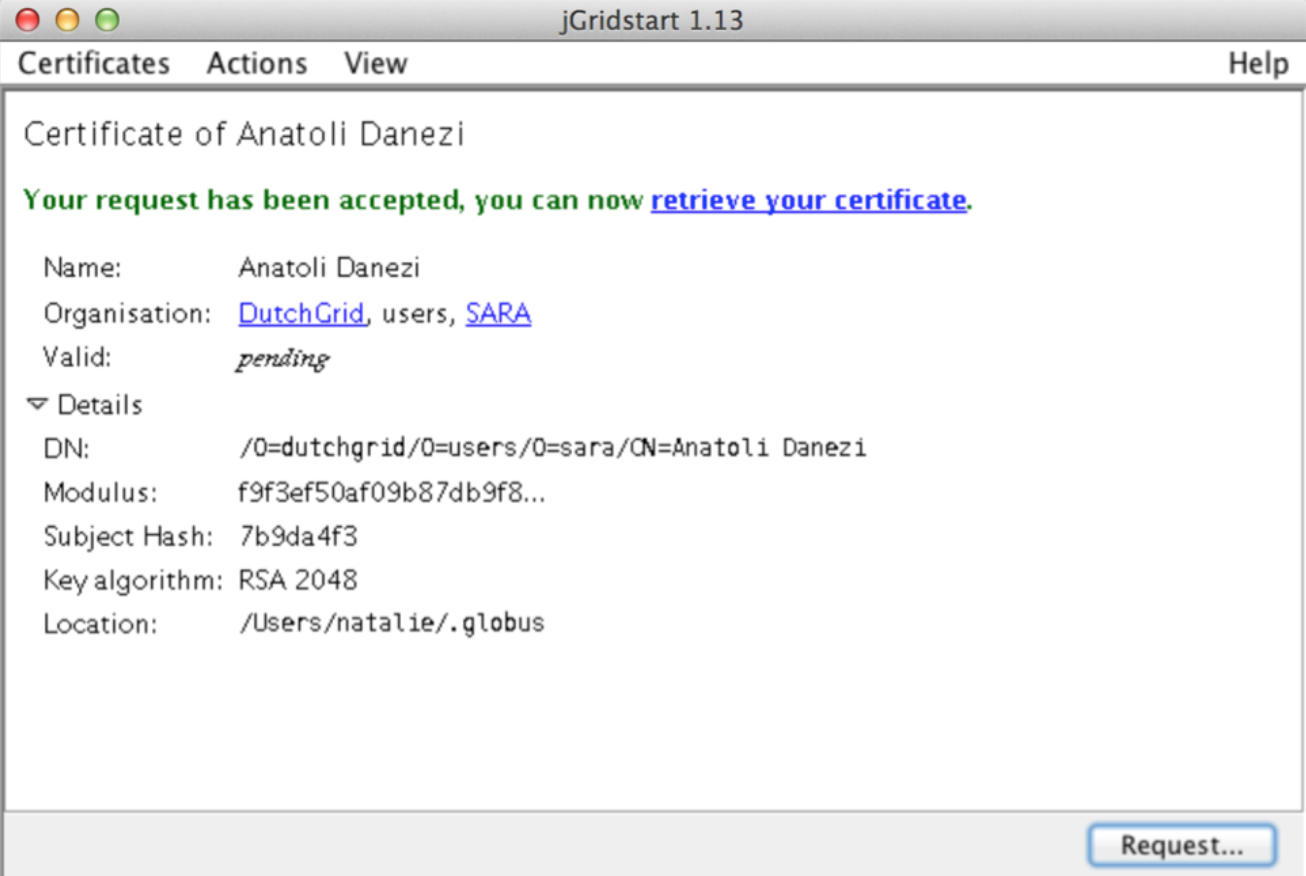
Click on retrieve your certificate. This will automatically create a file
usercert.pemin your~/.globusdirectory (check with$ ls ~/.globus).You may skip the step “install in browser” because the X session on the UI is slow and will probably be interrupted. Just click “Next”
Close the wizard.
If everything went well, your certificate and key files (usercert.pem and userkey.pem) should be in the ~/.globus directory.
Install a DutchGrid certificate on the UI
If you followed the steps above properly, then your DutchGrid certificate and private key file should now be present in the ~/.globus directory (notice the dot!) on the User Interface machine. All you need to do is to set the proper permissions.
Log in to your UI account:
$ssh homer@ui.grid.sara.nl # replace "homer" with your username!
Set the proper permissions to your certificate files:
$cd $HOME/.globus
$chmod 644 usercert.pem
$chmod 400 userkey.pem
Note that the private key file should be read-only and only readable to you.
Verify the correct permissions:
$ cd $HOME/.globus
$ ls -l
-rw-r--r--      1 homer    homer            4499  May 10 13:47  usercert.pem
-r--------      1 homer    homer             963  May 10 13:43  userkey.pem
Install a DutchGrid certificate in your browser
In order to apply for a VO membership you will have to install your certificate in your browser. Note that you can do this from any browser, however for convenience we will describe the procedure using the UI browser.
Log in to your UI account:
$ssh -Y homer@ui.grid.sara.nl # replace "homer" with your username!
$cd $HOME/.globus
Warning
You can import a certificate in your browser only when it is in the PKCS12 format. This means that you need to convert the usercert.pem and userkey.pem files to a single .p12 file.
Convert PEM to pkcs12
To convert a PEM file to the PKCS12 format, run on the UI:
$openssl pkcs12 -export -inkey userkey.pem -in usercert.pem -out browsercert.p12
This will ask you for a password three times: the first is to unlock your private key stored in the file userkey.pem. The PKCS12-file will be password protected, which needs a new password, and the same password for confirmation. Note that your can use the same password as the password for the private key file, but this is not necessary.
Import the certificate to the browser
- To import the
.p12file in your browser, open a Firefox window ($ firefox &) on the UI and apply the following steps (Note that you may have to copy the .p12 file to a directory accessible from your browser): - From the Firefox Menu bar select:
For Firefox versions older than v57.0:
Edit > Preferences > Advanced > View Certificates > ImportFor Firefox versions higher than v57.0:
Firefox > Preferences > Privacy & Security > scroll to the bottom "Security" section > View Certificates > Import
Select the
browsercert.p12file from the UI local directoryGive the password you set in the previous step.
You should now see the certificate listed. Close the window.
- To import the
Verify that your certificate is valid and properly installed in your browser by accessing this website:
If you receive an SSL authentication error, then try repeating the steps carefully as they come. If you managed to access the page above, your certificate is successfully installed!