
webdav clients
This page describes how to use the webdav protocol. For an overview of storage clients, see Storage clients.
About WebDAV
The WebDAV protocol has the following advantages:
It supports not only x509 (user certificate or proxy) authentication, but also username & password authentication and macaroon authentication
It uses the common port 443. Some overly strict firewalls may block outgoing traffic, but port 443 is so common that it is seldom blocked. However, using WebDAV to bypass firewalls should be seen as a temporary solution; it would be better to open up your institute’s firewall to allow access to the dCache subnet.
It can transfer data over a secure channel; other protocols like GridFTP do authentication over a secure channel but transfer data unencrypted.
It also has disadvantages:
It is not a high performance transfer protocol. If this is important, use GridFTP instead.
Support by WebDAV clients varies widely. Some operations (like renaming a file) may not work in certain clients and circumstances. Modifying/overwriting a file, although the WebDAV protocol supports it, doesn’t work on dCache; you’ll need to delete the old file and upload the new file instead.
Available WebDAV doors
dCache has the following WebDAV doors:
URL including port |
Authentication method |
Remarks |
|---|---|---|
User/password, macaroon |
Redirects on read |
|
User/password, macaroon, X509 |
No redirects |
|
User/password, macaroon |
No redirects; maximum transport security |
|
X509, macaroon |
Redirects on read and write |
|
X509, macaroon |
No redirects |
|
X509, macaroon |
No redirects; maximum transport security |
|
X509, macaroon |
No redirects; maximum transport security |
|
Same as webdav.grid.surfsara.nl, but IPv4 only |
||
Choosing a WebDAV door
Authentication
The most important consideration is whether you want to authenticate with username/password or with x509 (certificate/proxy). See the above table. All WebDAV doors support macaroons (bearer tokens).
Transport security
Another important consideration is whether a WebDAV door should redirect or not; this affects transport security and throughput.
Advantages of redirects:
It’s a form of load balancing, which improves the speed.
Redirecting WebDAV doors do the authentication over HTTPS, but they redirect your client to an HTTP port. So the data transfer is unencrypted. This too improves speed.
Disadvantages of redirects:
File transfers are sent over HTTP, so they are not encryted. A “man in the middle” might be able to read the data, or even modify it in transit. If privacy is a concern, choose a door that does not redirect.
Some WebDAV clients don’t handle redirects very well.
If transport security is a requirement, we suggest to use the WebDAV doors on port 2881 or 2884 for the best transport security. They use only TLSv1.2 or better, and they are configured with encryption ciphers that offer Perfect Forward Secrecy. They have some extra HTTP security headers that may make abuse more difficult.
There might be some clients that have difficulties connecting to these high security doors. If data security is important to you, we suggest you find clients that do support these improved security settings. In the future, these settings will be applied to ports 2880 and 2883 as well.
Performance
Another consideration is whether you’re using the door for parallel access.
webdav.grid.surfsara.nl is a DNS round robin that will direct you to a (more or less) random host in a pool of WebDAV servers. So it is very well suited for parallel access. The other host names are not powered by a group of nodes, so they are less suited to parallel processing.
Firewall issues
Use webdav-cert.grid.sara.nl when you want to authenticate with a user certificate or proxy, and your institute’s firewall blocks outgoing connections to port 2882 to 2884. It’s a single virtual machine; don’t use it for parallel processing. It is configured with the best security settings, like the ones on port 2881 and 2884.
IPv4 / IPv6
All WebDAV doors are dual stack: they support both IPv4 and IPv6, with IPv6 as the preferred protocol. Use ipv4.grid.surfsara.nl for storage clients that have problems with IPv6. It’s a single virtual machine; don’t use it for parallel processing.
Clients
We’ve tested these WebDAV clients successfully with dCache:
web browsers (read only)
curl
wget (read only)
rclone (username/password; no x509 authentication)
cyberduck (GUI)
We’ll describe how to use them below.
Web browsers
The easiest way to access dCache is with a normal web browser. You can point a browser like Firefox to https://webdav.grid.surfsara.nl/pnfs/grid.sara.nl/data/ or any of the other WebDAV doors listed in the table above. When the browser asks for a username and password, you can provide your Grid UI (or CUA) username and password. An icon in front of each file indicates the locality of the file (tape or disk). When you click on a listed file, it will be downloaded, if you’re authorized to do so.
You can’t upload to dCache WebDAV with a normal browser. There is a new interface, dCache View, that allows you to upload files from your browser. This is still in development, so test it first before using it for production data.
Curl & wget
Note
To run the examples below you need to have a UI (or CUA) account that is configured within dCache and authorized to the data you want to access. Contact us if you need assistance with that.
Creating directories
To create a directory with curl:
$curl --capath /etc/grid-security/certificates/ --fail --user homer \
     --request MKCOL https://webdav.grid.surfsara.nl/pnfs/grid.sara.nl/data/lsgrid/homer/directory
If on your system there are no Grid CA certificates available in /etc/grid-security/certificates/, please read host_certificates.
Transferring data
Uploading
To copy a file from your local machine to dCache:
$curl --capath /etc/grid-security/certificates/ --fail --location --user homer \
     --upload-file zap.tar \
     https://webdav.grid.surfsara.nl/pnfs/grid.sara.nl/data/lsgrid/homer/
$# replace homer with your username, lsgrid with your VO and zap.tar with your local file
The command will ask for the password of ‘homer’ on the command line. If you don’t want to type the password each time, specify --netrc and store the password in the .netrc file in your home dir. Make sure it is not readable by others (chmod 600 .netrc). See man curl for more details. An example .netrc file is:
$ cat .netrc
machine webdav.grid.surfsara.nl
login <your_username>
password <your_pwd>
Note
It is possible to specify the password on the command line like this: --user homer:password. However, for security reasons this should be avoided on shared systems (like the UI) because it allows other local users to read the password with the ps command.
Downloading
To copy a file from dCache to your local machine:
$curl --capath /etc/grid-security/certificates/ --fail --location --user homer \
     https://webdav.grid.surfsara.nl/pnfs/grid.sara.nl/data/lsgrid/homer/zap.tar \
     --output zap.tar
Or with wget:
$wget --user=homer --ask-password --ca-directory=/etc/grid-security/certificates \
     https://webdav.grid.surfsara.nl/pnfs/grid.sara.nl/data/lsgrid/homer/zap.tar
The --ca-directory is probably not necessary anymore. If it is, but you don’t have an /etc/grid-security/certificates directory, you could specify --no-check-certificate, but we don’t recommend this.
Downloading with proxy authentication
To download a file while using a proxy to authenticate, you first have to create your proxy, see StartGridSession.
Then use a command like this:
$curl --location --capath /etc/grid-security/certificates/ \
     --cert $X509_USER_PROXY --cacert $X509_USER_PROXY \
     https://webdav.grid.surfsara.nl:2882/pnfs/grid.sara.nl/data/lsgrid/homer/zap.tar
Note
It is possible that your proxy DN is mapped to another user account than your own CUA user account. If you have permission issues with either username or proxy and not the other, contact us to check the user mapping.
Note: wget does not support certificate/proxy authentication.
Partial downloads
With Curl you can download only part of a file by specifying –range. Example:
$curl --fail --location --capath /etc/grid-security/certificates/ \
     --user homer \
     https://webdav.grid.surfsara.nl/pnfs/grid.sara.nl/data/lsgrid/homer/myfile \
     --range 0-4 \
     --output first-5-bytes
Renaming
With proxy authentication
$curl --capath /etc/grid-security/certificates/  --fail --location \
     --cert $X509_USER_PROXY --cacert $X509_USER_PROXY \
     --request MOVE \
     https://webdav.grid.surfsara.nl:2882/pnfs/grid.sara.nl/data/lsgrid/homer/oldfile \
     --header "Destination:https://webdav.grid.surfsara.nl:2882/pnfs/grid.sara.nl/data/lsgrid/homer/newfile"
File properties and locality are not changed. A file that is stored on tape (nearline) will stay on tape, even if it is moved to a directory for disk-only files.
With username/password authentication
$curl --capath /etc/grid-security/certificates/  --fail --location-trusted \
     --user homer \
     --request MOVE \
     https://webdav.grid.surfsara.nl:2880/pnfs/grid.sara.nl/data/lsgrid/homer/oldfile \
     --header "Destination:https://webdav.grid.surfsara.nl:2880/pnfs/grid.sara.nl/data/lsgrid/homer/newfile"
Please note the differences with the previous example:
--location-trustedwill send the username and password also to the destination server.Port
2880is used for username/password authentication.
Removing data
Deleting a file from dCache:
$curl --capath /etc/grid-security/certificates/ --user homer --location \
     --request DELETE https://webdav.grid.surfsara.nl/pnfs/grid.sara.nl/data/lsgrid/homer/zap.tar
Querying file properties
With curl and a dCache WebDAV door, it’s possible to request file properties. This works both with username/password and proxy authentication, provided you use the correct port (443 or 2880 for username/password, 2882 or 2883 for proxy authentication).
Locality
This example shows how to query the file locality: whether a file is online or nearline (on tape). This example uses username/password authentication:
$echo -e '<?xml version="1.0"?>\n
         <a:propfind xmlns:a="DAV:">
         <a:prop><srm:FileLocality xmlns:srm="http://srm.lbl.gov/StorageResourceManager"/></a:prop>
         </a:propfind>' \
| curl --silent --fail --capath /etc/grid-security/certificates/ \
       --user homer --request PROPFIND \
       https://webdav.grid.surfsara.nl:2880/pnfs/grid.sara.nl/data/lsgrid/homer/zap.tar \
       --header "Content-Type: text/xml" --upload - \
| xmllint -format -
See Staging files for more information about file locality.
Adler32 checksums
This example shows how to get the Adler32 checksum of a stored file. dCache uses Adler32 checksums by default, but this can be configured per project.
The returned checksum comes from the dCache database, so it is a very efficient way to check your files. dCache does checksum checks on most operations, so you can safely assume the checksum matches the stored file.
$curl --head --header 'Want-Digest: ADLER32' --silent --fail --capath /etc/grid-security/certificates/ \
     --user homer \
     https://webdav.grid.surfsara.nl/pnfs/grid.sara.nl/data/lsgrid/homer/myfile \
| grep 'adler32='
Here an example output:
Digest: adler32=46fd067a
Here is an alternative way to query an Adler32 checksum:
$echo -e '<?xml version="1.0"?>\n
         <a:propfind xmlns:a="DAV:">
         <a:prop><srm:Checksums xmlns:srm="http://www.dcache.org/2013/webdav"/></a:prop>
         </a:propfind>' \
| curl --silent --fail --capath /etc/grid-security/certificates/ \
       --user homer --request PROPFIND \
       https://webdav.grid.surfsara.nl/pnfs/grid.sara.nl/data/lsgrid/homer/myfile \
       --header "Content-Type: text/xml" --upload - \
| xmllint -format - \
| egrep -o '<ns1:Checksums>.*</ns1:Checksums>'
Here is an example of the expected output:
$<ns1:Checksums>adler32=46fd067a</ns1:Checksums>
There’s a script that uses the above technique to retrieve checksums: https://github.com/onnozweers/dcache-scripts/blob/master/get-file-checksum
MD5 checksums
dCache is configured to use Adler32 checksums by default. However, in some cases, dCache may have a file’s MD5 checksum in its database.
You can use WebDAV to retrieve the MD5 checksum of a file, when it is in dCache’s database. It’s a bit more complicated than Adler32 because MD5 checksums are presented in base64 encoding, as prescribed by RFC 3230.
$curl --head --header 'Want-Digest: MD5' --silent --fail --capath /etc/grid-security/certificates/ \
     --user homer \
     https://webdav.grid.surfsara.nl:2880/pnfs/grid.sara.nl/lsgrid/homer/myfile \
| grep -o 'md5=.*' \
| sed -e 's/md5=//' -e 's/[\r\n]*$//' \
| base64 --decode \
| xxd -p
The output should look similar to this:
0f43fa5a262c476393018f7329080fa7
An alternative way to query an MD5 checksum:
$echo -e '<?xml version="1.0"?>\n
         <a:propfind xmlns:a="DAV:">
         <a:prop><srm:Checksums xmlns:srm="http://www.dcache.org/2013/webdav"/></a:prop>
         </a:propfind>' \
| curl --silent --fail --capath /etc/grid-security/certificates/ \
       --user homer --request PROPFIND \
       https://webdav.grid.surfsara.nl:2880/pnfs/grid.sara.nl/lsgrid/homer/myfile \
       --header "Content-Type: text/xml" --upload - \
| xmllint -format - \
| egrep -o '<ns1:Checksums>md5=.*</ns1:Checksums>' \
| sed -e 's#<ns1:Checksums>[^=]*=\([^<]*\)</ns1:Checksums>#\1#' \
| base64 --decode \
| xxd -p
Queries can be combined to reduce transaction overhead:
$echo -e '<?xml version="1.0"?>\n
         <a:propfind xmlns:a="DAV:">
         <a:prop><srm:RetentionPolicy xmlns:srm="http://srm.lbl.gov/StorageResourceManager"/></a:prop>
         <a:prop><srm:AccessLatency xmlns:srm="http://srm.lbl.gov/StorageResourceManager"/></a:prop>
         <a:prop><srm:FileLocality xmlns:srm="http://srm.lbl.gov/StorageResourceManager"/></a:prop>
         <a:prop><srm:Checksums xmlns:srm="http://www.dcache.org/2013/webdav"/></a:prop>
         </a:propfind>' \
| curl ...
There’s a script that uses the above technique to retrieve checksums: https://github.com/onnozweers/dcache-scripts/blob/master/get-file-checksum
Rclone
Rclone is a command line tool that you can download from https://rclone.org/downloads/. It works on many platforms and it can talk to many storage systems besides WebDAV.
Advantages of Rclone are:
It can sync directories, like rsync does
For directories, it uses parallel transfers, 4 by default, to get a better performance
For authentication, Rclone can use username/password (from the CUA) or token based (macaroon, see below) authentication, but not X509 certificate/proxy authentication. If you have a Grid certificate and want to use Rclone, you can use get-macaroon with your Grid certificate or proxy to create an Rclone config file with a macaroon for authentication; see the chapter below.
Note
New versions of Rclone will use multiple streams for files that are larger than 200 MB, but dCache may not support that. Please use Rclone with --multi-thread-streams 1. Rclone will then only use one stream per file, but it will still do 4 files in parallel when copying directories.
Note
The default idle timeout in Rclone is 5 minutes. This may be too short for the checksum calculation phase when uploading large files (>10GB). You can increase it with --timeout=240m.
Note
When uploading files from multiple Rclone clients in parallel, please add --no-traverse as argument. Rclone by default does a directory listing before upload. When this is done in parallel for large directories, it can be bad for performance.
The first time you use rclone, you need to make a profile with rclone config.
As the remote URL, you can use for example https://webdav.grid.surfsara.nl:443/pnfs/grid.sara.nl/data/lsgrid/homer (for performance) or https://webdav.grid.surfsara.nl:2880/pnfs/grid.sara.nl/data/lsgrid/homer (with encrypted transport).
An example of a profile:
[dcache]
url = https://webdav.grid.surfsara.nl:2880/pnfs/grid.sara.nl/data/lsgrid/homer
vendor = other
user = homer
pass = *** ENCRYPTED ***
An example of using rclone to copy a directory:
$rclone --multi-thread-streams 1 --timeout=240m --no-traverse copy mydir dcache:rclone-test
More information on how to use rclone with WebDAV is here: https://rclone.org/webdav/. There are also graphical user interfaces to rclone; one is RcloneBrowser.
Graphical access with Cyberduck
To work with WebDAV on Windows or Mac OS X, you can install Cyberduck from here: https://cyberduck.io/. Please note that the App store package costs money; the download from the website is free, but will ask for a donation.
Download the .zip file, open it, and drag the .app file into your Applications folder to install it.
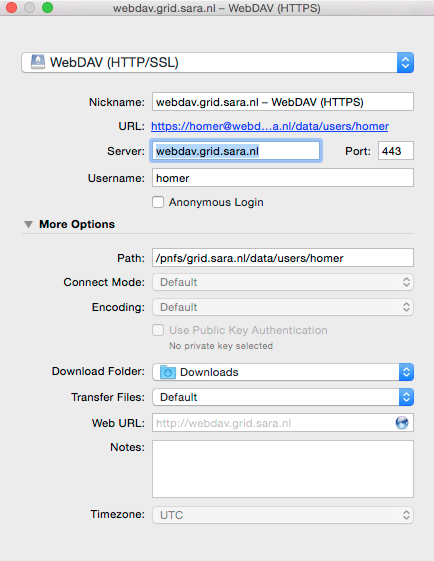
Open a WebDAV (HTTP/SSL) connection and connect to the server with your UI account username and password:
https://webdav.grid.surfsara.nl/pnfs/grid.sara.nl/data/lsgrid/ # replace lsgrid with your VO
Cyberduck with a user certificate
Normally, one would authenticate to dCache using a user certificate or proxy. dCache determines your identity based either on your user certificate or proxy DN, or on your VOMS credentials. However, if you authenticate with your CUA username & password, that identity might not be the same and you may not have access to your own data.
To work around this, it may be useful to have Cyberduck authenticate you using your user certificate.
Note
Most users are authenticated based on the VOMS credentials of their proxy. Since you will not use a VOMS proxy but a certificate, this identity mapping won’t work and you may not have access. Instead, we may need to map your DN onto the desired identity instead of your VOMS credentials. If you want to use Cyberduck with certificate authentication, contact us so that we can map your DN to the desired identity.
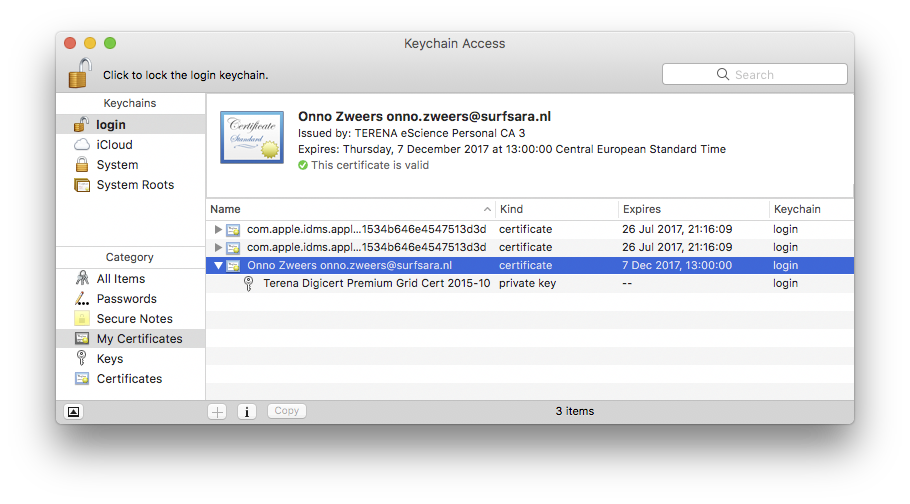
Here is how to configure Cyberduck for certificate authentication on OS X:
First, import your user certificate in p12 format into the Keychain Access. It should look something like this:
Second, go to Cyberduck and create a bookmark with these settings:
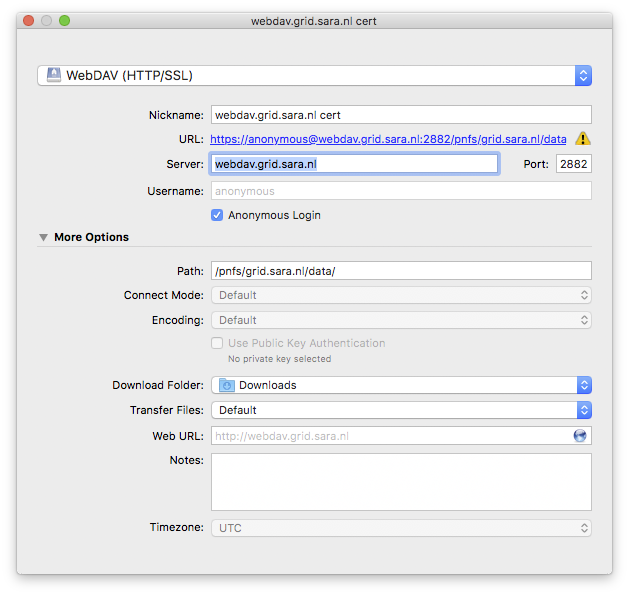
If your institute blocks outgoing traffic to port 2882 and 2883, you can use server webdav-cert.grid.sara.nl and port 443, as described at the top of this page.
Right-click the bookmark and choose “Connect to server”.
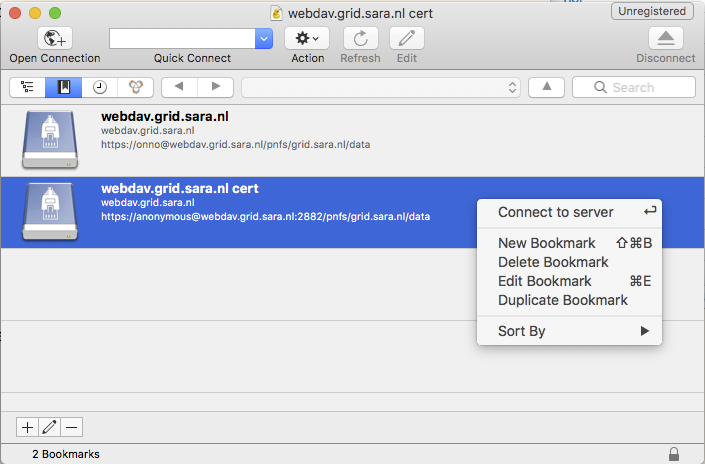
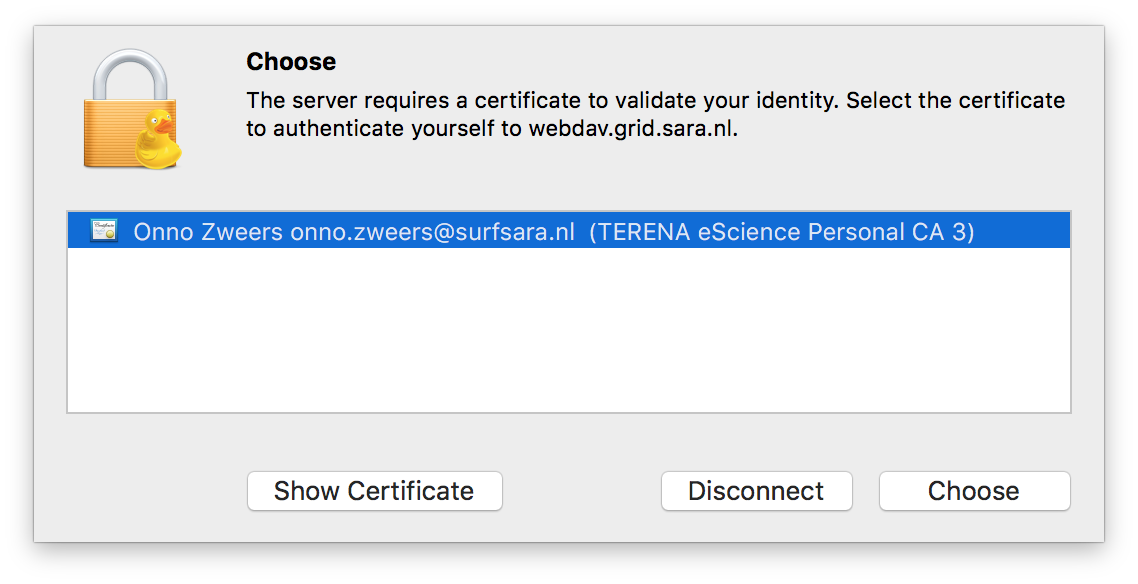
Choose your certificate.
Mounting WebDAV with Mountain duck
Mountain Duck is a WebDAV client that can mount WebDAV in OS-X and Windows. We’ve had some mixed results using it with dCache, so you should test it before trusting it with your data. You can find it at https://mountainduck.io/.